About Me

- melwdswife
- Hi! I am Melody, aka melwdswife. I have many furbabies and a wonderful hubby. My two main addictions at the moment are music and tagging.
~I CT for~

PinkParadox Productions
~I CT for~
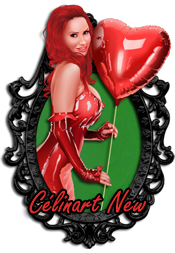
Celinart Pinups
~I also CT for~

Crystals Creations
My Blinkie :)

~Proud Member of~

Sunday, June 30, 2013
~PTU TUT~ ~Kawaii Candyland~
~PTU TUT~ ~Kawaii Candyland~
***CT for
PinkParadox Productions***
~Kit: Kawaii Candyland~


This tutorial
was written by myself on June 27, 2013.
Any similarities to another tutorial are purely coincidental. Please do not claim as your own. This tutorial writer assumes you have a
working knowledge of using Paint Shop Pro.
This tutorial
was done in Paint Shop ProX4, but can be adapted to use in other
Paint Shop
Pro versions.
It has 190
elements, 15 frames, and, 25 papers…enough to satisfy any sweet-tooth! Full of
yummy confections and sweet elements, frames, and papers!
Tube:
by Elia
Chatzoudis, an exlcusive tube at SATC HERE: You must have the proper license to use this tube.
PlugIns:
EyeCandy Gradient Glow
Font: bubblegum HERE
Ready? Ok, let’s begin! J
And don’t
forget to save as you go!
Open New
Image 500 x 500
Open, copy
and paste frame 15, resize to fit; refer to my image for placement. Add drop
shadow of choice.
Open paper 5,
copy, paste, resize, activate your frame layer, select the inside with your
magic wand, expand by 5, invert, activate your paper layer again, press delete
key, and select none.
Open, copy
and paste the following elements and place where you like, or refer to my image
for placement; add drop shadow of choice.
Element 108
Element 13
Element 143-147
*(no drop shadow added on these)
Element 16
Element 28
Element 58
Element 70
Elements
71-75
Element 154**
I added gradient glow to the green bow to make it pop a bit more.
Element 186
(x2, one flip horizontal)
Add your
tube, refer to my image for placement, add drop shadow of choice.
Add your copyright
and license information, and your name; I added gradient glow with a color from the
tube.
That’s it, you
are done!
Thank you for
looking at my Tutorial. I would love to
see anything you create using it! Email
me your results at melwdswife@yahoo.com, put “tutorial” in the subject. You
can also leave a comment or a note in my shoutbox. I would love to hear from you! Xoxo

Thursday, June 27, 2013
~CT PinkParadox Productions~
**Kit is Dark Passions** available at PFD here
Tube is by Freya Langford-Sidebottom and is available at AIL here:
Below is the tag for Freya and some extra freebie snags! Thanks for looking!

Below is the tag for Freya and some extra freebie snags! Thanks for looking!


and, if you are offended by the "a" word, please, skip this last tag....

If you snag, please, leave me some love or a thank you!


~PTU TUT~ ~Dark Passions~
***CT for
PinkParadox Productions***
~Kit: Dark Passions~


This tutorial
was written by myself on June 26, 2013.
Any similarities to another tutorial are purely coincidental. Please do not claim as your own. This tutorial writer assumes you have a
working knowledge of using Paint Shop Pro.
This tutorial
was done in Paint Shop ProX4, but can be adapted to use in other
Paint Shop
Pro versions.
It has 150
elements, 10 frames, and, 20 papers!
PlugIns:
EyeCandy Gradient Glow
Font:
Copasetic. You can get this font
HERE:
Ready? Ok, let’s begin! J
And don’t
forget to save as you go!
Open New
Image 500 x 500
Open paper
15, copy, paste and resize to cover your image.
Load mask of
choice
Open frame 4,
copy, paste and resize, refer to my image for placement. Add drop shadow of choice.
Open close up
layer of tube. Copy and paste into
image, resize and refer to my image for placement. Add drop shadow of choice.
Open paper 8,
copy and paste below frame layer. Activate
frame layer, using magic wand, click inside the frame, expand selection by 5,
invert, activate layer paper 8, delete, Activate close up tube layer, delete,
select none, make sure tube is above paper 8 and select Luminance. Open copy
and paste girl tube into your image.
Resize to fit, and flip horizontal. Refer to my image for placement. Add drop shadow of choice. Merge this group of frame 4, closeup girl,
paper 8.
Open, copy
and paste the following elements and place where you like, or refer to my image
for placement; add drop shadow of choice.
Element 90
Element 63
Element 104
(3 times, different sizes)
Element 110
Element 119
Element 125
Element 130
Add your copyright
and license information. I added gradient glow with a color from the tube.
Add your name
and you are done!
Thank you for
looking at my Tutorial. I would love to
see anything you create using it! Email
me your results at melwdswife@yahoo.com, put “tutorial” in the subject. You
can also leave a comment or a note in my shoutbox. I would love to hear from you! Xoxo

Tuesday, June 25, 2013
~CT: Posh Pets~ ~PinkParadox Productions~
~PTU TUT~ ~Posh Pets~
***CT for
PinkParadox Productions***
~Kit: Posh Pets~


This tutorial
was written by myself on June 23, 2013.
Any similarities to another tutorial are purely coincidental. Please do not claim as your own. This tutorial writer assumes you have a
working knowledge of using Paint Shop Pro.
This tutorial
was done in Paint Shop ProX4, but can be adapted to use in other
Paint Shop
Pro versions.
Tube: Seana by misticheskaya. You can get
here at PFD, HERE: You must have the proper license to
use this tube.
Mask:
weescottlass
mask 212. You can get it here:
PlugIns:
EyeCandy Gradient Glow
Font:
Chalk Hand lettering. You can get
this font HERE:
Ready? Ok, let’s begin! J
And don’t
forget to save as you go!
Open New
Image 500 x 500
Open paper 2,
copy and paste into your image, resize.
Add Mask of
choice, I used mask 212 by weescottlass.
Merge group. Add drop shadow of choice.
Open paper 6,
copy and paste. Activate the mask/paper
2 layer; Using your magic wand, click inside the mask, expand by 5, activate
the paper 6 layer, invert and delete. Move
below the mask group.
Open your
tube, copy and paste, move to where you like, add drop shadow of choice; and
move below the mask group. Duplicate
it. Take the other copy of your tube,
move above mask group, and erase the parts you don’t want showing.
Open, copy
and paste element 1, resize and place where you want inside the mask layer,
darken layer.
Open, copy
and paste the following elements and place where you like, or refer to my image
for placement; add drop shadow of choice.
Element 90
Element 10
Element 42
Element 49
Element 14
Element 9
Element 8
Element 1(again)
Add your
copyright and license information. I added gradient glow with a color from the
tube.
Add your name
and you are done!
Thank you for
looking at my Tutorial. I would love to
see anything you create using it! Email
me your results at melwdswife@yahoo.com, put “tutorial” in the subject. You
can also leave a comment or a note in my shoutbox. I would love to hear from you! Xoxo

~CT~ ~Stars & Stripes~ ~Freebie Snaggables~
Here are some snaggable freebies for you! Using Stars & Stripes by PinkParadox Productions Scrap Kit! I just love this kit...and all it's possibilities! You can get her kit at PicsForDesign HERE: . So, to download, right click and save as... :)


Thanks for looking and please leave some love if you download! xoxo

Sunday, June 23, 2013
Snaggables?
Hello all!
I was wondering, what types of snaggables would you all want? "Snagged", "Voted",...what else? Please leave a comment below and I will try! Thanks!
~CT~ ~Citrus~ by PinkParadox Productions
~PTU TUT~ ~Citrus~
***CT for
PinkParadox Productions***
~Kit: Citrus~


This tutorial
was written by myself on June 22, 2013.
Any similarities to another tutorial are purely coincidental. Please do not claim as your own. This tutorial writer assumes you have a working knowledge of using Paint Shop Pro. This tutorial
was done in Paint Shop ProX4, but can be adapted to use in other Paint Shop
Pro versions.
Tube: Amber by Alehandra V. You can get
here at PFD, HERE: you must have the proper license to
use this tube.
PlugIns:
EyeCandy Gradient Glow
Font:
Cooldots You can get this font
HERE:
Ready? Ok, let’s begin!
And don’t
forget to save as you go!
Open New
Image 600x600
Open element
92, copy and paste, resize to fill the layer.
Open element
93, copy and paste, resize to fill the layer.
Add drop shadow of choice.
Open Frame
10, copy and paste, and resize to fit, add drop shadow of choice.
Open paper
13, resize to 600x600. Copy and paste above frame layer. Take your magic wand, activate the frame
layer, click in the frame, expand selection enough to cover all the lace,
activate the paper layer, invert, delete, select none. Move paper below frame.
Open your
tube, copy and paste, move to where you like, add drop shadow of choice. Duplicate it.
Activate one tube layer, and do the same as above step. Take the other tube, and erase the parts you don’t
want showing.
Add the following
elements (Or any of those that you choose), adjust the size to your liking, add
drop shadow of choice. Here are the elements
I used:
Element 13
Element 54
Element 74
Element 83
Element 102
Element 105
Element 103
Element 37
Element 52
Element 21
Add your
copyright and license information. I added gradient glow with a color from the
tube.
Add your name
and you are done!
Thank you for
looking at my Tutorial. I would love to
see anything you create using it! Email
me your results at melwdswife@yahoo.com, put tutorial in the subject. You can
also leave a comment or a note in my shoutbox.
I would love to hear from you!
Xoxo

Wednesday, June 19, 2013
~CT Tag~
~Gypsy Girl by Pink Paradox Productions~


***Here are the extras! :) ***


Thanks for looking and please, leave some love if you download! Just right click and save to your computer!

Thursday, June 6, 2013
PTU TUT: Just Beachy
***CT PinkParadox Productions***
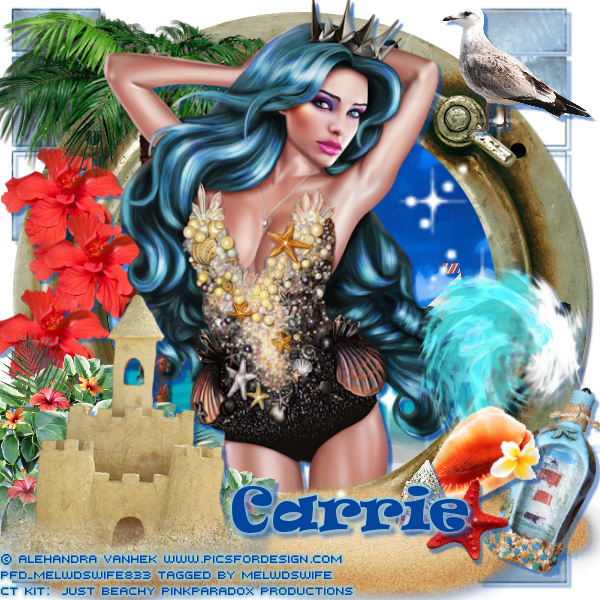

Tube: Queen of the
Ocean by: Alehandra Vanhek at PFD HERE:
You must have a license to use this work.
Mask: Vix 387, you can get it HERE:
This tutorial was written on June 5, 2013.
Any similarities to another tutorial is purely coincidental.
Please do not claim as your own.
This tutorial writer assumes you have a working
knowledge of using Paint Shop Pro.
This tutorial was done in Paint Shop ProX4,
but can be adapted to use in other
Paint Shop Pro versions.
Ready? Ok, let's begin!
Open new image 600x600
Open Frame 3, copy and paste into new image, resize 70% Add drop shadow of choice. (I used horizontal and vertical at 3, opacity
at 85, blur at 4, and color is #034aa9)
Open element 100, copy, paste, resize and move behind frame,
refer to my image for placement. Add
drop shadow of choice.
Open paper 3, copy, paste and resize 70%, place below frame
layer.
Activate frame, Take your magic wand, click inside frame,
expand by 10, Activate paper 3 layer, invert, delete. Select none.
Open paper 8, copy paste and resize 70%, place below paper 3
layer. Load mask Vix 387. Merge group.
Open element 118, copy paste and resize to fit, see my tag
above for placement.
Add drop shadow of choice.
Do the same with the following elements:
Element 10
Element 1
Element 121
Element 20
Element 33
Element 88
Element 84 duplicate x3
Element 144
Element 8
Element 4
Element 126, flip horizontal
Open your tube, copy resize and paste in frame as above.
Add the proper copyrights.
Add your name, I used font: Ravie You
can get it HERE:
Save as PNG and we are done!
Thank you for looking at my Tutorial. I would love to
see anything you create using it! Email me your results at melwdswife@yahoo.com, put tutorial in
the subject. You can also leave a comment or a note in my shoutbox. I
would love to hear from you! Xoxo

Tuesday, June 4, 2013
~PTU TUT~ ~Midnight Gypsy~
***CT for
PinkParadox Productions***
~Kit: Gypsy Girl~


This tutorial
was written by myself on June 4, 2013. Any similarities
to another tutorial are purely coincidental. Please do not claim as your own. This tutorial writer assumes you have a
working knowledge of using Paint Shop Pro.
This tutorial
was done in Paint Shop ProX4, but can be adapted to use in other
Paint Shop
Pro versions.
Kit: Gypsy Girl by
PinkParadox Productions; kit is inspired by the Exclusive PFD tube by the same
name. This kit is exclusive to PFD HERE:
Tube: Gypsy Girl, an PFD Exclusive by Alex
Prihodko. You can get here at PFD, HERE: you must have the proper license to use this tube.
Mask: mask 222 from weescotslasscreations
HERE:
PlugIns:
EyeCandy Gradient Glow
Ready? Ok, let’s begin! J
And don’t forget
to save as you go!
Open New
Image 600x600
Open frame 6,
resize to fit. Add drop shadow: I used
vertical/horizontal 3, opacity 85, blur 4, color: #202020
Open paper
2. Shift D, close original. Resize 67%. Opacity 79%
Activate your
frame layer, magic wand inside the frame, go to selections, float, defloat,
expand by 5, and activate your paper layer, invert and delete.
Open paper 4,
copy & paste under paper 2. Load mask, merge group. Add drop shadow of choice: I used same as
above, except color: #7c2e9d
Open your
tube, chose the colors that you would like on her, and paste tube into your
image. Resize to fit.
Open the
following elements, resize as desired, refer to my image for placement, and add
drop shadow of choice.
Element 1
Element 41
Element 49
Element 56
Element 60
Element 6
Element 46
Element 47
Element 43
Element 58
Element 61
Element 83
Element 111
Add your
copyright and license information. I added gradient glow with a color from the
tube.
Add your name
and you are done!
Thank you for
looking at my Tutorial. I would love to
see anything you create using it! Email
me your results at melwdswife@yahoo.com,
put tutorial in the subject. You can also leave a comment or a note in my
shoutbox. I would love to hear from
you! Xoxo

Subscribe to:
Posts
(Atom)
Fav Tut Blogs


Blogs I Stalk!
-
-
-
Blast from the past2 years ago
-
-
-
GI ♰BOGO MADNESS♰7 years ago
-
-
-
Fangtasia Blog Train Has Departed!14 years ago
-


Places I Hang
