About Me

- melwdswife
- Hi! I am Melody, aka melwdswife. I have many furbabies and a wonderful hubby. My two main addictions at the moment are music and tagging.
~I CT for~
PinkParadox Productions
~I CT for~

Celinart Pinups
~I also CT for~
Crystals Creations
My Blinkie :)

~Proud Member of~

Monday, March 31, 2014
~CT PinkParadox/Celinart~ ~Sleeping Beauty/Nina~
2 tag show off:
Part 2 of Sleeping Beauty
~PinkParadox Productions~
~Sleeping Beauty~

click the image above to go to the store for purchase.
~Celinart Pinups~
~Nina~

Click the image above to go to the store for purchase.
Here are my 2 tag showoffs:
Please do not claim as your one.


Here is Nina in her kitty garb! She also comes with a bunny layer, too! And, what's even better: She has desaturate layers to match your needs exactly!


Thanks for looking!

Wednesday, March 26, 2014
~CT PinkParadox/Celinart~ ~Sleeping Beauty/Tina~
2 tag show off, part 1 of Sleeping Beauty!
~CT PinkParadox Productions~
~Sleeping Beauty~

click the image above to go to the store for purchase
~CT Celinart Pinups~
~Tina~
~you must have the proper license to use this work~

click the image above to go to the store for purchase
~Below are my tags for this awesome kit!~
~140 elements, 12 frames, and 35 papers~
~from dark Malificent to bright Aurora~
~please do not claim as your own~


Stay tuned for part 2 of this fabulous kit!
Thanks for looking!

Tuesday, March 18, 2014
CT Crystals Creations: My Blue Emo
Taggie show off for Crystals Creations Kit: My Blue Emo.

This was such a fun kit!

click the image above to go to the store for purchase.
Thanks for looking! Remember, use proper license and/or copyright as applicable.

Monday, March 17, 2014
~PTU Tutorial ~ ~Daisy's Fresh Fruit~
~CT PinkParadox Productions and CT Celinart~
PTU TUT Daisy's Fresh Fruit

This tutorial was written on March 16, 2014.
Any similarities to another tutorial is purely coincidental.
Please do not claim as your own.
This tutorial writer assumes you have a working
knowledge of using Paint Shop Pro.
This tutorial was done in Paint Shop ProX4,
but can be adapted to use in other
Paint Shop Pro versions.
***CT for PinkParadox Productions***
~Kit: Fresh & Fruity~

Click image above to purchase!
***CT for Celinart Pinups***
~Tube: Daisy~

Click image above to purchase
You MUST have the proper license to use this piece!

Here's what you need:
Template: Fresh & Fruity, available HERE for download.
Plug-ins: Gradient Glow
Drop Shadow used: Vertical 4, Horizontal 4, Opacity 82, blur 4, color: #202020
Inner Bevel: Bevel 2, width 15, smoothness 25, depth 18, ambience 4, shininess 30, color: white #ffffff, angle: 4, intensity 35, elevation 63
Font: Curlz MT HERE
Font Color: Chose colors from your tube.
Remember, please use all images properly, and license where applicable.
We will start from the bottom layer up, unless otherwise stated.
Abbreviations used:
DS - drop shadow
RTF - resize to fit
C/P - copy and paste
Ready? Let's begin!
(please, dont forget to save as you go!)
First:
Open Template, Shift D, exit original.
Delete "bottom" and "Template by melwdswife" layers.
Second:
Open Tube, Shift D, exit out of original tube;
Listed below are the Tube selections used for this tutorial:
Here is the color used on the desaturate layers: #cd0429
Bow desaturate
bow desaturate
lace desaturate
skirt dark desaturate
(inactivate skirt light desaturate)
corset desaturate
bras desaturate
lips desaturate
hair 02 desaturate
bow hair desaturate
Body
Copy Merged and paste in image, add DS of choice. Leave this on the bottom for now, name this layer Daisy, we will get back to it soon.
Inactivate Daisy layer for now...
Ok, Now on to the good stuff!
1. Stamp Right Layer
c/p paper 33, resize 50%
Activate the stamp left layer.
Select All
Float, Defloat
Invert
Activate paper 33 layer and delete.
Select none.
Delete stamp left layer.
Add d/s of choice.
Rename Stamp Right
2. Stamp Right Back
c/p paper 12, duplicate 2 more times, rename them 12a, 12b, 12c.
Activate the stamp right back layer.
Select All
Float, Defloat
Invert
Activate layer 12b and delete.
Select none.
Delete stamp right back.
Add d/s of choice.
Rename Stamp Right Edge
3. Stamp Middle Layer
c/p paper 24, resize 50%
Activate the stamp middle layer.
Select All
Float, Defloat
Invert
Activate paper 24 layer and delete.
Select none.
Delete stamp middle layer.
Add d/s of choice.
Rename Stamp Middle
4. Stamp Middle Back
Activate the stamp middle back layer.
Select All
Float, Defloat
Invert
Activate layer 12c and delete.
Select none.
Delete stamp middle back.
Add d/s of choice.
Rename Stamp Middle Edge
5. Stamp Left Layer
c/p paper 34, place the paper as my image.
Activate the stamp left layer.
Select All
Float, Defloat
Invert
Activate paper 34 layer and delete.
Select none.
Delete stamp left layer.
Add d/s of choice.
Rename Stamp Left
6. Stamp Left Back
Activate the stamp left back layer.
Select All
Float, Defloat
Invert
Activate layer 12a and delete.
Select none.
Delete stamp left back.
Add d/s of choice.
Rename Stamp Left Edge
7. Scallop
c/p paper 30.
Activate the scallop layer.
Select All
Float, Defloat
Invert
Activate paper 30 layer and delete.
Select none.
Delete scallop layer
Add d/s of choice.
Rename Scallop
8. Scallop Back
c/p paper 34, resize 50%
Activate the scallop back layer.
Select All
Float, Defloat
Invert
Activate paper 34 layer and delete.
Select none.
Delete scallop back layer.
Add d/s of choice.
Rename Scallop Edge.
Now, remeber that Daisy Layer? Well, reactivate her. Duplicate her twice.
Name one layer "Daisy Middle" , name one: "Daisy Right, name the last "Daisy Left"
9. Daisy Middle
Take Daisy Middle and place her between the Stamp Middle and Stamp Middle Edge.
Refer to my image for placement.
Take your magic wand, click INSIDE Stamp Middle Edge
Expand Selection by 10
Invert
Activate Daisy Middle Layer
Delete.
Select None.
Duplicate Daisy Middle Layer. Change Blend mode on lower to Screen.
Change Blend mode of copy of Daisy Middle Layer to Luminance Legacy.
10. Daisy Right
Take Daisy Right and place her between the Stamp Right and Stamp Right Edge.
Refer to my image for placement.
Take your magic wand, click INSIDE Stamp Middle Edge
Expand Selection by 10
Invert
Activate Daisy Middle Layer
Delete.
Select None.
Change blend mode to Luminance Legacy and opacity to 75
11. Daisy Left
Take the Daisy Left tube.
Resize to fit, and refer to my image for placement.
Add Drop Shadow of Choice.
12. Elements
C/P elements, RTF,
Refer to my image for placement and add DS of choice.
115
130
137
151
92
20 flip horizontal
97
57
10
107
108
109
161 resize 50%
70
9
Bring your Daisy Left layer to the top, above all your elements.
Bring steps 7 and 8 up to this layer.
13. Fresh n Fruity Edge.
Activate the Fresh n Fruity back Layer.
c/p paper 31.
Select All
Float, Defloat
Invert
Activate paper 31 layer, resize by 50%, and delete.
Select none.
Delete fresh n fruity back layer
Add d/s of choice.
Rename Fresh n fruity Edge
14. Fresh n Fruity WordArt
Activate "Fresh N Fruity raster" layer
Gradient Glow of choice.
Add copyright layer with proper license.
Add name, convert to raster, inner bevel: (see above for Inner Bevel Details)
Then add Eye Candy Gradient Glow to name, width 12, Corners, 25, Opacity 100, color from tube add DS.
~~~~~~~~~~~~~~~~~~~~~~~~~~~~~~~~~~~~~~~~~~~~~~~~~~~~~
Thats it! :) Thanks for looking! Hope you enjoyed the tut.
I would love to see any tags you make with my tutorial! email them to me at: melwdswife@yahoo.com Have fun! Please, leave some love or a thank you!

Friday, March 14, 2014
CT Crystals Creations ~~ Snowflakes
CT for Crystals Creations
Kit: Snowflakes
(Her blog has links to her stores HERE)

For these tag show offs, I used the beautiful work of Edward Reed. I purchased these tubes when he was with a previous company that is no longer in business. You can find his tubes at CDO (as of 3.14.14). To use his work, you must have a license and use the correct copyright.


Hope you like what you see! All of the tags I make come from my own imagination. Any similarity to others' creations are purely coincidental. Please do not claim as your own. Thanks for looking!

Thursday, March 13, 2014
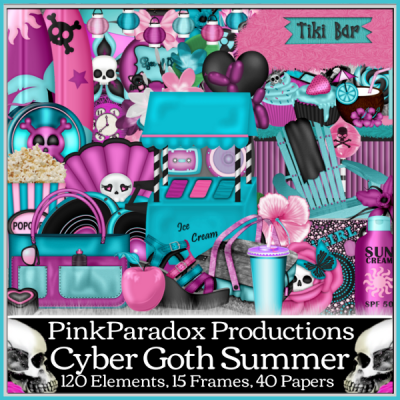
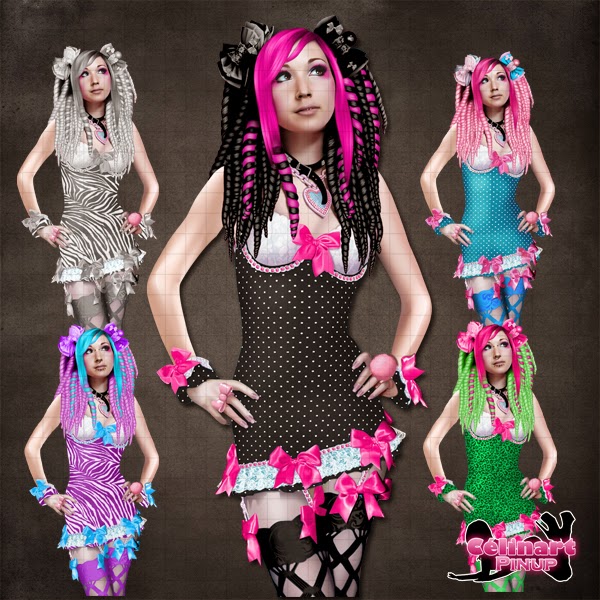
~CT PinkParadox Productions/Celinart~ ~Cyber Goth Summer/Princesse Pudding~
CT for PinkParadox Productions
~Cyber Goth Summer~
(click the image below for purchase!)
CT for Celinart Pinups
~Princesse Pudding~
You must have the proper license and copyright to use this work.
(Click the image below for purchase!)
Let me first say, that I just adore this tube and kit. They are both super fun!


And this one, just makes me want to head to a carnival and grab some cotton candy!


Thanks for looking and hope you like!

Wednesday, March 12, 2014
~CT Tag show off~ ~Masquerade Mystique~ ~PinkParadox Productions~
2 Tag Show Off
PinkParadox Productions
Masquerade Mystique

Below are my 2 taggies:
For the first one, I used the work of VeryMany Tubes; this tube EMOlution 20 available at PFD HERE:

You MUST have the proper license and copyright to use this work.
For this second tag, I used the work of Souldesigner, available at PFD HERE:

You MUST have the proper license and copyright to use this work.
Thank you for looking. Remember, these are my creations, please do not claim as your own.

Thursday, March 6, 2014
~CT PinkParadox Productions~ ~A Kiss for Luck~
~CT for PinkParadox Productions~
~taggie show off~
~Kit: A Kiss for Luck~

This used the work of misticheskaya, available at PFD. You must have the proper license to use this work.

This tag used the work of ZlataM; it is available at PFD. You must have the proper license to use this work.
This is an awesome kit! It has way more that just for March 17th/St. Patricks Day. Click the image below to go to the store!

Thanks for looking! Hope you like!

Subscribe to:
Posts
(Atom)
Fav Tut Blogs


Blogs I Stalk!
-
-
-
Blast from the past2 years ago
-
-
-
GI ♰BOGO MADNESS♰7 years ago
-
-
-
Fangtasia Blog Train Has Departed!14 years ago
-


Places I Hang
