About Me

- melwdswife
- Hi! I am Melody, aka melwdswife. I have many furbabies and a wonderful hubby. My two main addictions at the moment are music and tagging.
My TOU's
My TOU's:
Cluster Frame TOU's:
Please, post a preview in your group, but please, link back to my blog for download. Thanks!
Tutorial TOU's:
All of my tuts are my own ideas and inspirations. Any resemblance to another tutorial is purely coincidental. Please do not rewrite or claim as your own.
All tutorials are for personal use only and all scrap kits and tubes are either free to use or paid to use. Please credit everyone that needs to be credited and give a link back to their site when using their supplies.
Please, enjoy yourself when doing my tutorials. If you are having problems with a link, please, let me know at melwdswife@yahoo.com. In the subject line, please put "link".
I would love to see what you have made! Send me the tag, and I will post it in my gallery! melwdswife@yahoo.com In the subject line, please put "tag".
Forum Challenge Hosts: You may use any of my tutorials in any of your challenges. You may share the original preview, but link back to my blog for view. Do not upload to your own share site.
If you have any questions or comments, please email me at melwdswife@yahoo.com
I reserve the right to amend these terms at any time.
Thank you!
Powered by Blogger.
Followers
Contact Form
Search This Blog
Total Pageviews
Thursday, June 26, 2014
CT Tutorial: Lil Ladybug
CT PTU Tutorial: Lil' Ladybug
This tutorial was written on June 24, 2014.
Any similarities to another tutorial is purely coincidental.
Please do not claim as your own.
This tutorial writer assumes you have a working
knowledge of using Paint Shop Pro.
This tutorial was done in Paint Shop ProX4,
but can be adapted to use in other
Paint Shop Pro versions.
Tutorial
CT for Crystals Creations
Kit: Lil Ladybug
Check her blog for the stores she sells at!
Tube: PTU tube 18-3 by Anna Marine, available at CDO.
You MUST have the proper license to use this piece!
Here's what you need:
Template: Template4 by melwdswife (that's me! :) )
Available HERE:
Plug-ins: Gradient Glow
Drop Shadow used: Vertical 4, Horizontal 4, Opacity 82, blur 4, color: #202020
Inner Bevel: Bevel 2, width 15, smoothness 25, depth 18, ambience 4, shininess 30, color: white #ffffff, angle: 4, intensity 35, elevation 63
Font: Scrypticali Font HERE
Font Color: #ba0201 (or other colors from your tube)
Remember, please use all images properly, and license where applicable.
We will start from the bottom layer up, unless otherwise stated.
Abbreviations used:
DS - drop shadow
RTF - resize to fit
C/P - copy and paste
Ready? Let's begin!
(please, dont forget to save as you go!)
Open Template4
Shift D, close out original.
Delete the "made by" layer.
Delete the "background" layer.
*
C/P paper 1, RTF.
Activate "large Back Circle" and select with your magic wand.
Invert
Activate paper 1 layer, delete, select none.
Delete Large Back Circle Layer.
Add DS of choice.
*
C/P paper 5, RTF.
Activate "Bottom Bar" and select with your magic wand.
Invert
Activate paper 5 layer, delete, select none.
Delete Bottom Bar Layer.
Add DS of choice.
*
C/P paper 12, RTF.
Activate "L Top Circle".and select with your magic wand.
Invert
Activate paper 12 layer, delete, select none.
Delete L Top Circle Layer.
Add DS of choice.
*
C/P paper 9, RTF.
Activate "L bottom Circle"and select with your magic wand.
Invert
Activate paper 9 layer, delete, select none.
Delete L Bottom Circle Layer.
Add DS of choice.
*
C/P paper 11, RTF.
Activate "R Top Circle" and select with your magic wand.
Invert
Activate paper 11 layer, delete, select none.
Blend mode: Darken.
Delete R Top Circle Layer.
Add DS of choice.
*
C/P paper 13, RTF.
Activate "R Bottom Circle" and select with your magic wand.
Invert
Activate paper 13 layer, delete, select none.
Delete R Bottom Circle Layer.
Add DS of choice.
*
C/P paper 7, RTF.
Activate "Middle Circle" and select with your magic wand.
Invert
Activate paper 7 layer, delete, select none.
Blend mode: Darken.
Delete Middle Circle Layer.
Add DS of choice.
*
C/P elements, RTF, refer to my image for placement and add DS
1
10
16
32
33
27
26
18
*
C/P tube of choice.
I used 18-3 by Anna Marine.
RTF
Add DS of choice.
Refer to my image for placement.
*
C/P elements, RTF, refer to my image for placement and add DS
30
20
*
Add copyright layer with proper license.
Add name, convert to raster, inner bevel: (see above for Inner Bevel Details)
Then add Eye Candy Gradient Glow to name, width 12, Corners, 25, Opacity 100, color from tube add DS.
Thats it! :) Thanks for looking! Hope you enjoyed the tut.
I would love to see any tags you make with my tutorial! email them to me at: melwdswife@yahoo.com Have fun! Please, leave some love or a thank you!
Wednesday, June 25, 2014
~FTU Template4 ~
Hi all!
Here is a new template I made!
It is free to use. Just click on the image to download!
Below is an example of a tag I made with it:
Like the tag above? Go HERE for the tutorial!
Remember, I created this on my own. Any similarities to any other template is completely coincidental and accidental.
Remember, I created this on my own. Any similarities to any other template is completely coincidental and accidental.
Please, say thank you if you download.
Thursday, June 19, 2014
~CT~ Gothic Bubble Gum and Razor Candi
~CT Show off~
~PinkParadox Productions~
&
~Celinart Pinups~
The kit is by PinkParadox Productions, called "Gothic Bubblegum". It is available HERE.
The tube is "Razor Candi" by Celinart Pinups, available HERE.
You must have the proper license and copyright to use this work.
Below are my tag showoffs!
Thanks for looking!
These are my own creations, do not claim as your own!
Monday, June 16, 2014
~CT~ ~PinkParadox Productions~ ~Vampire Bride~
~CT for PinkParadox Productions~
~Vampire Bride~
Gorgeous. Gothic. Black and red. Wickedly wonderful!
185 elements.
20 frames.
40 papers. (PinkParadox is the best at papers!)
This kit is available HERE
This first tag uses the beautiful work of Alehandra Vanhek from PFD. HERE. You must use the proper license and copyright to use this work.
This second tag uses the fabulous work of James Adams. This piece is available in Pinup Fantasies & Faerie Tales Issue #4. HERE You MUST have the proper license and copyright to use this piece.
Thanks for looking! Remember, these are my own creation...do not claim as your own.
Wednesday, June 11, 2014
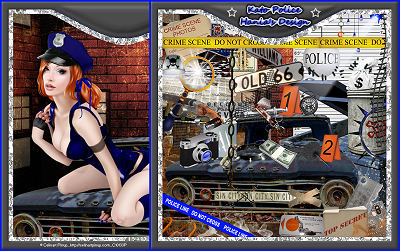
~Kato 2~ ~Police~
~CT Celinart Pinups~
~Kato2~
You can purchase your own tube HERE. She does come with some desaturate layers to make her match what ever kit you use exactly, and a super awesome zombie layer!!!!!!
You must use the proper copyrights and licenses to use this work.
~Guest CT for Hania Designs~
~Kato Police kit~
This fun kit is designed to match the police layer on the Kato 2 Tube by Celinart Pinups!
You can get your own kit right HERE
Thanks for looking! Remember, this tag came from my own mind. Do not claim as your own.
Tuesday, June 10, 2014
~CT~ ~PinkParadox Productions~ ~Celinart Pinups~
~CT PinkParadox Productions~
~Peach Sand~
Super cute beachy kit. Has a cute old-time type of feel.
Click HERE for the link to the store!
~CT CelinartPinups~
~Amelia Summer Tube~
You MUST have the proper license and copyright to use this work!
Click HERE to go to the store for purchase!
Here are the close ups of the tag show offs!
Thanks for looking! Remember, these came from my own head. Do not claim as your own.
Subscribe to:
Comments
(Atom)
Fav Tut Blogs
Blogs I Stalk!
-
-
-
-
-
-
GI ♰BOGO MADNESS♰9 years ago
-
-
-
-


